I'm still trying to work on this schedule of mine. Meanwhile, all I have to show is that I've finally managed to hang the two paintings that came out of the Pages and Paint workshop that I actually wanted to frame. Both of these are hanging in rooms that don't get very much (or good) natural light, so the pictures are just so-so. Both were also painted on 6x6" flat gessobords, and I decided to frame them using Blick's gallery frames in the same size. I was just waiting until I had to place another order at Blick, and I just did, for the co-op art class that begins this week. (!yay!) These frames were each under $10 and I'm really happy with how the pieces look in them. I didn't cover them with the plastic front piece; I prefer these to be framed but still open.
This is the one I did using a sketch of my daughter playing at the beach, and it's hanging in her room now.
And this is my poetry quote (from Prufrock, of course). It's now hanging on my (still-unpainted) bedroom wall, where I can see it when I wake up.
You can see both of these paintings in much better light in photos from previous posts: beach and quote.
I've also finally gotten around to getting my birch trees ready for hanging. I always envisioned this hanging loosely, so I added casings at the top and bottom and bought some really beautiful oak dowels at the hardware store. I hemmed the sides, sewed the casings, and cut the dowels to size. The bottom one isn't meant to be seen--I may add a few stitches to hold it in there securely--it just adds weight so the fabric hangs nicely. The top one extends two inches out on either side, but you can't really see that, because my assistant (my younger son) has the dowel in a very firm grip, being very mindful that dropping mama's trees (which he likes very much) would get them dirty.
This isn't quite ready to hang--my original thought had been to gently carve into the top dowel near each edge, just deep enough so that some hanging wire or fishing line wouldn't slip out of it; I'd wrap the wire on each side, with some slack, and hang it from the middle. I still want to hang it that way, but I'm going to look for some finials or end caps that fit the ends, instead of carving indentations. I think it will give it a more finished look, and also make sure the wire or line doesn't slip off the ends. This requires another trip to the hardware store, so it may take a bit to finish this off completely, but I'm almost there. Another plus of hanging it this way is that it doesn't hide the back, which is just as interesting, in its own way, as the front.
Showing posts with label home. Show all posts
Monday, September 10, 2012
Saturday, May 26, 2012
To-Do To Done
My to-do list is so big and so deep and so tall...and so eclectic, and containing some curious choices, considering. But bit by bit, I'm clearing my way through.
Something I wanted to get to before heading up to Squam...making my own bug spray. (My daughter helped--I'm sure you can see her touch with the letter placement?) I made a half-recipe (because that's the size bottle I had) of the Bug Stay-Away in The Rhythm of Family, except I substituted lavender oil for the lemongrass oil, both because I already had lavender and because that's the recipe of this bug spray that lots of people recommended in the Squam group on Ravelry. So this has essential oils of lavender, citronella, and eucalyptus. I'll let you know how it works!
Friday night my oldest and I ran errands after dinner to pick up some supplies (and presents) for his brother's birthday, which is coming up. While we were out, I bought some things for my trip.
I realized I have nothing waterproof for my feet except for my winter boots, which, while I love them, they're probably a bit much. So just in case it rains and the camp turns to puddles and mud, I now have rain boots. Actually, I have waterproof "garden boots," found in the gardening section at Target and half the price of their waterproof "rain boots." I'm thinking about painting black circles and faces on them, so they match my daughter's ladybug rain boots. I picked up a headlamp (for walking on dark trails and/or knitting in poor light in the evening) and a beach towel too. I actually don't have a beach towel--I've always just borrowed the kids' as necessary, to cut down on things to bring. But since it won't be raining (because I'm bringing rain boots, of course), I figured I can spread that towel out on the dock and relax in the sun.
Major item off my list...and I will post more on this skirt later in the week.
Winter woolens, soaking--and even more impressive is that I scrubbed that utility sink, which was filthy with paint and who-know-what-all else, I mean scrubbed, so that I could clean the kids' hats and mittens before packing them away, and then give my favorite spring cardigan a wash before I leave (because it's coming with me).
My to-do list, by the way, is one of those that doesn't actually result in an impressively clean house before guests arrive for a party (in two days). What can I say? At least the woolens will be clean.
Something I wanted to get to before heading up to Squam...making my own bug spray. (My daughter helped--I'm sure you can see her touch with the letter placement?) I made a half-recipe (because that's the size bottle I had) of the Bug Stay-Away in The Rhythm of Family, except I substituted lavender oil for the lemongrass oil, both because I already had lavender and because that's the recipe of this bug spray that lots of people recommended in the Squam group on Ravelry. So this has essential oils of lavender, citronella, and eucalyptus. I'll let you know how it works!
Friday night my oldest and I ran errands after dinner to pick up some supplies (and presents) for his brother's birthday, which is coming up. While we were out, I bought some things for my trip.
I realized I have nothing waterproof for my feet except for my winter boots, which, while I love them, they're probably a bit much. So just in case it rains and the camp turns to puddles and mud, I now have rain boots. Actually, I have waterproof "garden boots," found in the gardening section at Target and half the price of their waterproof "rain boots." I'm thinking about painting black circles and faces on them, so they match my daughter's ladybug rain boots. I picked up a headlamp (for walking on dark trails and/or knitting in poor light in the evening) and a beach towel too. I actually don't have a beach towel--I've always just borrowed the kids' as necessary, to cut down on things to bring. But since it won't be raining (because I'm bringing rain boots, of course), I figured I can spread that towel out on the dock and relax in the sun.
Major item off my list...and I will post more on this skirt later in the week.
Winter woolens, soaking--and even more impressive is that I scrubbed that utility sink, which was filthy with paint and who-know-what-all else, I mean scrubbed, so that I could clean the kids' hats and mittens before packing them away, and then give my favorite spring cardigan a wash before I leave (because it's coming with me).
My to-do list, by the way, is one of those that doesn't actually result in an impressively clean house before guests arrive for a party (in two days). What can I say? At least the woolens will be clean.
Monday, April 16, 2012
Felt Flower Garland {+ Poem Link}
Our slider was desperately in need of some spring freshening; it was well past time for the Valentine banner to go. Somehow, I missed March entirely...which works out well, because these flowers are so seasonal!
This garland idea was inspired by the craft in the last Waldorf parent-child group that my daughter and I attend. The leader had materials to make spring crowns for the kids. Everybody's ended up looking different, of course, but the basic idea was to finger knit the base and then sew on felt flowers (whatever sort of flowers we wanted).
This crown has three flowers, but my daughter was wearing it jauntily, to one side. At any rate, I thought some green crocheted chains with sewn-on felt flowers would be just perfect for our window.
I wasn't going for perfection here. The flowers were traced around a cut-out paper guide, but they're cockeyed and lopsided in places. This came together very quickly; I'm not interested in trying to dress up this window in any manner that will lead to stress. It's fun, it's quick, and it's cheery. We have a little vine of flowers trailing atop the window molding, and I love it.
***
For today's poem, I turned to Mary Oliver. I am betting many of you have read or heard her quote, "Tell me, what is it you plan to do/with your one wild and precious life?" Knowing she's a poet, I was curious about the rest of the poem--I was sure I hadn't read it before. It's called "The Summer Day," and you can read it here. This quote is always used in an inspirational way, in a sort of "Get up and find your true self and passion and get going" sort of way, and I was pleased to discover that the speaker of the poem has spent the day being "idle and blessed," paying attention while she strolled and rolled through the fields. It's good to know the context, isn't it?
I spent today climbing big, rocky-shore rocks with my children; picnicking and playing at the playground; loading up on even more armloads of books at the library (we currently have a total of 51 books out between us, with ever-revolving due dates); and playing outside at home. They have the week off from school, and the weather is cooperating nicely so far. A fine way to spend a day of my wild and precious life.
This garland idea was inspired by the craft in the last Waldorf parent-child group that my daughter and I attend. The leader had materials to make spring crowns for the kids. Everybody's ended up looking different, of course, but the basic idea was to finger knit the base and then sew on felt flowers (whatever sort of flowers we wanted).
This crown has three flowers, but my daughter was wearing it jauntily, to one side. At any rate, I thought some green crocheted chains with sewn-on felt flowers would be just perfect for our window.
I wasn't going for perfection here. The flowers were traced around a cut-out paper guide, but they're cockeyed and lopsided in places. This came together very quickly; I'm not interested in trying to dress up this window in any manner that will lead to stress. It's fun, it's quick, and it's cheery. We have a little vine of flowers trailing atop the window molding, and I love it.
***
For today's poem, I turned to Mary Oliver. I am betting many of you have read or heard her quote, "Tell me, what is it you plan to do/with your one wild and precious life?" Knowing she's a poet, I was curious about the rest of the poem--I was sure I hadn't read it before. It's called "The Summer Day," and you can read it here. This quote is always used in an inspirational way, in a sort of "Get up and find your true self and passion and get going" sort of way, and I was pleased to discover that the speaker of the poem has spent the day being "idle and blessed," paying attention while she strolled and rolled through the fields. It's good to know the context, isn't it?
I spent today climbing big, rocky-shore rocks with my children; picnicking and playing at the playground; loading up on even more armloads of books at the library (we currently have a total of 51 books out between us, with ever-revolving due dates); and playing outside at home. They have the week off from school, and the weather is cooperating nicely so far. A fine way to spend a day of my wild and precious life.
Friday, February 10, 2012
How To: Lickety-Split Valentine's Day Napkins
When Valentine's Day falls on a school day, I like to tuck a surprise in my boys' lunches. Last year I wove a little heart out of paper and slipped a note inside. I was wondering what to do this year--and let's face it, I'm running out of time!--when I saw Maya's doily-printed coaster and I thought, Of course! Freezer paper! I love that stuff. I have a stack of white cloth napkins that I bought with embroidery in mind, but the fabric is all wrong for stitching. My kids take a cloth napkin in their lunch every day. Of course!
Materials: Freezer paper, heart hole punches or scissors, cloth napkin, textile paint (I like Speedball Screen Printing Inks), brush to apply
I began by cutting a square of freezer paper to fit in the corner of the napkin. Then I punched hearts into it, more or less dictated by how far the hole punch would reach. You can see that the cut-outs aren't perfect; it's not a very good hole punch, I don't think. (This is what I get for not waiting until I was at the store that carries Fiskars.) I neatened up best I could with an x-acto knife. If you don't have a heart hole punch, you could just cut some hearts the old-fashioned way with scissors.
Iron the freezer paper into the corner of the napkin, then dab on the paint.
I made five of them. Two will go to school with my boys, and the kids will each have one for Valentine's Day dinner. But also, there are five of us in the family, so we have a matching set for all of us, too.
When the paint is dry, heat set it (follow the instructions for your particular paint). And there you go--lickety-split Valentine's Day napkins. I made these after my kids were in bed Friday night.
This will be a sweet surprise in their lunch bag on Tuesday! And I was able to do it quickly and with supplies I already had on hand. Phew!
Materials: Freezer paper, heart hole punches or scissors, cloth napkin, textile paint (I like Speedball Screen Printing Inks), brush to apply
I began by cutting a square of freezer paper to fit in the corner of the napkin. Then I punched hearts into it, more or less dictated by how far the hole punch would reach. You can see that the cut-outs aren't perfect; it's not a very good hole punch, I don't think. (This is what I get for not waiting until I was at the store that carries Fiskars.) I neatened up best I could with an x-acto knife. If you don't have a heart hole punch, you could just cut some hearts the old-fashioned way with scissors.
Iron the freezer paper into the corner of the napkin, then dab on the paint.
I made five of them. Two will go to school with my boys, and the kids will each have one for Valentine's Day dinner. But also, there are five of us in the family, so we have a matching set for all of us, too.
When the paint is dry, heat set it (follow the instructions for your particular paint). And there you go--lickety-split Valentine's Day napkins. I made these after my kids were in bed Friday night.
This will be a sweet surprise in their lunch bag on Tuesday! And I was able to do it quickly and with supplies I already had on hand. Phew!
Labels:
for kids,
funfunfun,
gifty things,
holidays,
home,
printmaking,
tutorials
Monday, February 6, 2012
Valentine Banner
The kids and I collaborated on this month's seasonal window hanging. The full story on how we made it is over on my kids/art blog (as you can tell, because I was too lazy to change the name stamp on the pictures to this blog name). It involved paint, and more paint, and paper bags, and glue...
...and it is just so cheery. I admit, I'd been sort of proprietary of that window space, really enjoying decorating it and surprising my kids, but I also really enjoy looking at this Valentine heart, love-filled collaboration that will liven up our dining room all month long.
Since cutting out hearts is (just) a bit beyond my youngest's scissor skills right now, we gave her the scraps and a heart hole punch, and I made this sweet little hanging string of hearts that decorates the doorway at the top of the stairs, into the kitchen.
And this pretty much represents the sum total of weekend creating, and I'm amazed we managed this much. We had one kid in the ER Friday night, another at the pediatrician's bright and early Saturday morning, three separate trips to the pharmacy for prescriptions, and we parents were so exhausted we spent a goodly part of the weekend staring dumbly, trying to remember what we maybe had been going to say, again? Some weekends are like that.
But we have hearts. And I love 'em.
(This project was part of TinkerLab's latest creative challenge, using paper bags. If you're interested, all the information can be found on Rachelle's blog.)
...and it is just so cheery. I admit, I'd been sort of proprietary of that window space, really enjoying decorating it and surprising my kids, but I also really enjoy looking at this Valentine heart, love-filled collaboration that will liven up our dining room all month long.
Since cutting out hearts is (just) a bit beyond my youngest's scissor skills right now, we gave her the scraps and a heart hole punch, and I made this sweet little hanging string of hearts that decorates the doorway at the top of the stairs, into the kitchen.
And this pretty much represents the sum total of weekend creating, and I'm amazed we managed this much. We had one kid in the ER Friday night, another at the pediatrician's bright and early Saturday morning, three separate trips to the pharmacy for prescriptions, and we parents were so exhausted we spent a goodly part of the weekend staring dumbly, trying to remember what we maybe had been going to say, again? Some weekends are like that.
But we have hearts. And I love 'em.
(This project was part of TinkerLab's latest creative challenge, using paper bags. If you're interested, all the information can be found on Rachelle's blog.)
Sunday, January 15, 2012
Three Quick Things
One: A Felt Snowflake Banner
When I took our Advent Calendar down, our window looked so bare. We'd had the calendar up for the month of December, and before that, our Thankful Banner. I decided we needed something wintry to hold us over until February, when I'll make a Valentine's banner, and snowflakes seemed just the thing. (Note the lack of snow outside; I'm fine with that. If you average this January with last January, when we got 30" of snow, I think it's all working out.) I hadn't quite decided how to approach it when I saw the January Stitchalong at Feeling Stitchy would be couching. I haven't tried couching before, so I figured I would.
These snowflakes are far from perfect, but they're still kind of cute hanging in our window. I used felt from my shockingly large stash of the stuff (although this is a blend, not pure wool) and some silver craft cord. I drew the six main lines on with chalk, using a guide so I got the angles correct, and then I just winged it from there. I folded over the top edge of each square and whipstitched it down so I could string it along some cord for hanging. We all (that's me and the kids) think the third one looks like a six-armed sea star. Oh, well. I had to do three different snowflakes because no two are alike! At any rate, I really like having a seasonal banner hanging in the window. I'm going to try to keep up with it.
Two: A Dream/Wish Jar
This fulfills the weekend assignment for the Creative Courage e-course. I will admit this is not usually my thing. It's not that I don't have wishes or goals or ideas and so on, I just generally keep them tucked in, not on display. I'm struggling with the course, to be honest, because I was hoping to clarify what my goals might be, and I feel like I perhaps should have started already knowing. And also, things like meditation and visualization and wish/dream jars are not quite my style. But I'm trying. I threw a whole bunch of stuff in there. I'm sure they won't all happen. I think I'd be overwhelmed if they did, actually. And really, I was trying to focus, not spread a wide net. I probably did this all wrong. But the circles are pretty, aren't they?
Three: The Next Embroidery
Now that I'm done with making holiday gifts and whipping out blankets in record time, I really want to embroider. This is just a peek because I need to actually begin embroidering it before I show it in full. At this point I've tea-dyed a piece of white linen and used an iron-on transfer pen to transfer a drawing to the fabric. I must have done it correctly this time; it's much darker than the last time I tried. Actually, really dark. I hope I manage to cover up the lines. I'm trying a different type of image for me, and I'm excited about it in the way you can only be excited about something that will either be really amazing or a huge fail.
When I took our Advent Calendar down, our window looked so bare. We'd had the calendar up for the month of December, and before that, our Thankful Banner. I decided we needed something wintry to hold us over until February, when I'll make a Valentine's banner, and snowflakes seemed just the thing. (Note the lack of snow outside; I'm fine with that. If you average this January with last January, when we got 30" of snow, I think it's all working out.) I hadn't quite decided how to approach it when I saw the January Stitchalong at Feeling Stitchy would be couching. I haven't tried couching before, so I figured I would.
These snowflakes are far from perfect, but they're still kind of cute hanging in our window. I used felt from my shockingly large stash of the stuff (although this is a blend, not pure wool) and some silver craft cord. I drew the six main lines on with chalk, using a guide so I got the angles correct, and then I just winged it from there. I folded over the top edge of each square and whipstitched it down so I could string it along some cord for hanging. We all (that's me and the kids) think the third one looks like a six-armed sea star. Oh, well. I had to do three different snowflakes because no two are alike! At any rate, I really like having a seasonal banner hanging in the window. I'm going to try to keep up with it.
Two: A Dream/Wish Jar
This fulfills the weekend assignment for the Creative Courage e-course. I will admit this is not usually my thing. It's not that I don't have wishes or goals or ideas and so on, I just generally keep them tucked in, not on display. I'm struggling with the course, to be honest, because I was hoping to clarify what my goals might be, and I feel like I perhaps should have started already knowing. And also, things like meditation and visualization and wish/dream jars are not quite my style. But I'm trying. I threw a whole bunch of stuff in there. I'm sure they won't all happen. I think I'd be overwhelmed if they did, actually. And really, I was trying to focus, not spread a wide net. I probably did this all wrong. But the circles are pretty, aren't they?
Three: The Next Embroidery
Now that I'm done with making holiday gifts and whipping out blankets in record time, I really want to embroider. This is just a peek because I need to actually begin embroidering it before I show it in full. At this point I've tea-dyed a piece of white linen and used an iron-on transfer pen to transfer a drawing to the fabric. I must have done it correctly this time; it's much darker than the last time I tried. Actually, really dark. I hope I manage to cover up the lines. I'm trying a different type of image for me, and I'm excited about it in the way you can only be excited about something that will either be really amazing or a huge fail.
Monday, December 26, 2011
Sewn + Embroidered Closet Sachets
I hope you all had a wonderful weekend! Ours was very relaxing, which was just right this year, considering the lingering fatigue. Of course I still baked and cooked, but lots of time was spent in jammies, resting, reading, and knitting. This is a gift project that wasn't quite done heading into the last week before Christmas, so I finished it up in small bits. These were begun in September--I embroidered the pine cone motif on linen, then cut squares, hand sewed them, and finally, filled them with cedar shavings. Turns out there was really no shortcut for this part; it had to be done by hand, bit by bit. The shavings weren't going to fit through a funnel, and they didn't pour from a paper cup, either. When all four were filled, I sewed the filling holes shut.
They smell so nice, and they can be tucked into a drawer or hung in a closet. I gifted three of the four today. I really enjoyed making them. I didn't realize until I went looking for the first post that these were actually three months in the making. Of course it wasn't three solid months; I'd do a bit, put it aside, do the next step, and so on, in between other projects. But there's something nice about passing along, as a gift, something I've lived with for a quarter of the year. I hope they're hung in a visible part of the closet. I like to picture the recipients (my mothers-in-law, my sister-in-law, and my sister, who hasn't received hers yet but knows it's coming so this post is perfectly okay) opening the closet to grab a coat or sweater, seeing their hand-embroidered and -sewn sachet, and smiling. Because making these certainly made me happy.
Thursday, December 22, 2011
Turning: Winter Solstice
The kids and I made luminaria to celebrate winter solstice--I like to bring in the light to remind us all that it will return, same as always. These ancient rituals make a lot of sense to me. Since the solstice occurs at 12:30 am on the 22nd, I'm not quite sure if Wednesday night is the longest night, or Thursday night. We decided to play it safe and light our luminaria both nights.
In actuality, they will be lit most of the winter, or else other candles will be lit--I like to have a centerpiece of candlelight when the evenings are dark and cold.
Directions on how the kids and I made these (with two versions, one for younger kids and one for older, both very easy) can be found here.
Happy Winter Solstice to my fellow northern hemisphere dwellers! Here comes the sun... (no, really!!)
In actuality, they will be lit most of the winter, or else other candles will be lit--I like to have a centerpiece of candlelight when the evenings are dark and cold.
Directions on how the kids and I made these (with two versions, one for younger kids and one for older, both very easy) can be found here.
Happy Winter Solstice to my fellow northern hemisphere dwellers! Here comes the sun... (no, really!!)
Tuesday, November 29, 2011
(How To) Make Quahog (Clam) Shell Candles
(When I had this idea, I assumed others had as well and went looking for tips. I found some good information here, here [PDF link], here, and from the local beekeeper of South County Honey who sold me the beeswax at the farmers' market.)
Materials: Quahog shells (that's what we call clam shells in Rhode Island), beeswax, wick (large cotton braided), hot glue gun, old pan (not used for cooking), and large tin can.
When I looked online for information on how to do this, I found lots of pieces here and there. I've put it all together in case you want to try this too. I'm not only loving the final product here, but I love how it's so very local. The shells were collected at a local beach, and the bees who made the beeswax live down the road.
To start, I rinsed any sand from the shells and boiled them gently, just to make sure they were clean. I used the same pan I later used for the water bath (same water, too). Once again, I borrowed the pan I long ago handed over to my kids' play kitchen. You don't want to use a cooking pan for this, just in case you get wax on it. Once the shells were dry, I used the hot glue gun to attach the lengths of wick to the bottom of the shells.
The beekeeper suggested large cotton braid wick. He said the melting point of beeswax is high and you need a large wick to create a large enough flame--something like that, anyway. I was able to find it locally in a craft store by the spool. I cut the lengths of wick generously; they'll get trimmed later.
Next I needed to hack off some of that big block of beeswax so I could put smaller pieces in a clean tin can and melt them. Easier said then done. Eventually I managed.
This is an old knife and not one I'll ever use for food again, clearly. Here it's holding the tin can down so it doesn't float around in the water bath. The PDF I linked to above had some useful tips for melting beeswax, including the melting point of beeswax (about 145 F). This is far below the boiling point of water (212 F), so I set the burner to medium and kept a close eye, turning it down as necessary. I stirred the wax (with that knife again) once it began to melt, too. Once it was completely melted--and it smelled so nice!--I poured it into the shells. Since the water wasn't boiling, the can wasn't too hot to handle with my bare hands, which made pouring the wax much easier.
So, the first batch of wax that took me soooo long to hack off the block? Yielded two candles. Sigh. Anyway, you can see I propped the shells just a bit to keep them level, and on that back one, I clothes-pinned the wick to keep it straight. On most of them I was able to carefully drape them and it was Good Enough. My oldest was home sick while I was doing this, and we were trying to figure out a way to rig up a wick-holder-upper, but we settled for Good Enough in the end.
I repeated this process until all the shells (13, some larger than others but none huge) were filled.
I have a corner of the original block of wax left. The beekeeper also told me that beeswax burns straight down, so as these burn it probably won't burn all the wax on the edges. He suggested two wicks in a large shell, but I ended up going with one in all of them. I think it'll be fine on the smaller shells; I'm not sure on the slightly bigger ones. There may be some unused wax around the edges--perhaps the recipients will collect it and make new candles?
Here are the candles, wicks not yet trimmed, in boxes on my slightly messy dining room table because it was time to feed the kids lunch and I needed my kitchen counter.
And one last photo, of a candle in hand so you can see the size.
I love these!! I made enough so that we'll have some for us, too. Because these are holiday gifts, of course--a very local handmade Rhode Island gift.
Materials: Quahog shells (that's what we call clam shells in Rhode Island), beeswax, wick (large cotton braided), hot glue gun, old pan (not used for cooking), and large tin can.
When I looked online for information on how to do this, I found lots of pieces here and there. I've put it all together in case you want to try this too. I'm not only loving the final product here, but I love how it's so very local. The shells were collected at a local beach, and the bees who made the beeswax live down the road.
To start, I rinsed any sand from the shells and boiled them gently, just to make sure they were clean. I used the same pan I later used for the water bath (same water, too). Once again, I borrowed the pan I long ago handed over to my kids' play kitchen. You don't want to use a cooking pan for this, just in case you get wax on it. Once the shells were dry, I used the hot glue gun to attach the lengths of wick to the bottom of the shells.
The beekeeper suggested large cotton braid wick. He said the melting point of beeswax is high and you need a large wick to create a large enough flame--something like that, anyway. I was able to find it locally in a craft store by the spool. I cut the lengths of wick generously; they'll get trimmed later.
Next I needed to hack off some of that big block of beeswax so I could put smaller pieces in a clean tin can and melt them. Easier said then done. Eventually I managed.
This is an old knife and not one I'll ever use for food again, clearly. Here it's holding the tin can down so it doesn't float around in the water bath. The PDF I linked to above had some useful tips for melting beeswax, including the melting point of beeswax (about 145 F). This is far below the boiling point of water (212 F), so I set the burner to medium and kept a close eye, turning it down as necessary. I stirred the wax (with that knife again) once it began to melt, too. Once it was completely melted--and it smelled so nice!--I poured it into the shells. Since the water wasn't boiling, the can wasn't too hot to handle with my bare hands, which made pouring the wax much easier.
So, the first batch of wax that took me soooo long to hack off the block? Yielded two candles. Sigh. Anyway, you can see I propped the shells just a bit to keep them level, and on that back one, I clothes-pinned the wick to keep it straight. On most of them I was able to carefully drape them and it was Good Enough. My oldest was home sick while I was doing this, and we were trying to figure out a way to rig up a wick-holder-upper, but we settled for Good Enough in the end.
I repeated this process until all the shells (13, some larger than others but none huge) were filled.
I have a corner of the original block of wax left. The beekeeper also told me that beeswax burns straight down, so as these burn it probably won't burn all the wax on the edges. He suggested two wicks in a large shell, but I ended up going with one in all of them. I think it'll be fine on the smaller shells; I'm not sure on the slightly bigger ones. There may be some unused wax around the edges--perhaps the recipients will collect it and make new candles?
Here are the candles, wicks not yet trimmed, in boxes on my slightly messy dining room table because it was time to feed the kids lunch and I needed my kitchen counter.
And one last photo, of a candle in hand so you can see the size.
I love these!! I made enough so that we'll have some for us, too. Because these are holiday gifts, of course--a very local handmade Rhode Island gift.
Saturday, November 19, 2011
Gratitude Tree
Let me start by saying I don't believe thankfulness should be confined to November or that we should only turn our thoughts to gratitude because Thanksgiving is approaching. I believe an attitude of gratitude is directly linked to the habit of happiness, and that is how I try to live my life. Many many years ago, during a difficult time, I told myself to find something to be happy about every day, no matter how small, and then write it down. When you turn this into practice, it becomes a habit of the very best kind. Thankfulness is there at the core of me; I recognize my life is full of loveliness, both big and small. I no longer need to write it all down.
But because we are hosting Thanksgiving this year, I wanted a centerpiece that visually represented in some way this life full of reasons to be thankful. So I decided upon a tree. I picked up a fallen branch in the yard, stripped it of its dead leaves, and placed it in a clean glass jar, held in place by pebbles and stones. (The bag of pebbles--the only purchase I made for this project--cost about $2 at a craft store. The larger stones at the top are from the beach.)
Using the maple leaf template I traced for the thankful banner, I sized them to fit some tags I already had (bought in an office supply store) and sandwiched the tag inside two leaves.
I had to cut the tag so it tapered, and the leaves are printed on and cut from brown Kraft card stock.
Once the glue dried, they were ready to be written upon and hung on the branches. If you want to make your own, the PDF file with the smaller leaves is here. The left leaves are a mirror image of the ones on the right, so when you cut and sandwich, the cutting lines will be hidden. You also could simplify this by punching a hole in a single leaf to tie a string on.
The tree sits in the middle of our table, with leaves and a metallic Sharpie next to it. Anytime someone is moved to do so, he or she can add a leaf to the tree.
I think I'll also be using this leaf template to make our place cards for the dinner table. If our guests want to, they can add their leaves to the tree with something they are thankful for written on it.
For big things and small--the house and Legos, my marriage and coffee, the people in our family and imaginary friends--we are thankful, every day.
But because we are hosting Thanksgiving this year, I wanted a centerpiece that visually represented in some way this life full of reasons to be thankful. So I decided upon a tree. I picked up a fallen branch in the yard, stripped it of its dead leaves, and placed it in a clean glass jar, held in place by pebbles and stones. (The bag of pebbles--the only purchase I made for this project--cost about $2 at a craft store. The larger stones at the top are from the beach.)
Using the maple leaf template I traced for the thankful banner, I sized them to fit some tags I already had (bought in an office supply store) and sandwiched the tag inside two leaves.
I had to cut the tag so it tapered, and the leaves are printed on and cut from brown Kraft card stock.
Once the glue dried, they were ready to be written upon and hung on the branches. If you want to make your own, the PDF file with the smaller leaves is here. The left leaves are a mirror image of the ones on the right, so when you cut and sandwich, the cutting lines will be hidden. You also could simplify this by punching a hole in a single leaf to tie a string on.
The tree sits in the middle of our table, with leaves and a metallic Sharpie next to it. Anytime someone is moved to do so, he or she can add a leaf to the tree.
![]() |
| "The house" |
For big things and small--the house and Legos, my marriage and coffee, the people in our family and imaginary friends--we are thankful, every day.
Wednesday, November 16, 2011
Rocks + Leaves
It's been a rocky week thus far in the background here. When I get a chance, I've been cutting out more maple leaves--small ones this time. Focusing on getting those little leaf points just right, cutting out another and another and another, is soothing in its own way.
More on this project later, when it's complete. Before then, I have more leaves to cut.
Thursday, November 10, 2011
Thankful Banner
![]() |
| It's so hard to photograph against a window! |
![]() |
| Source: organizeyourstuffnow.com via Pinterest |
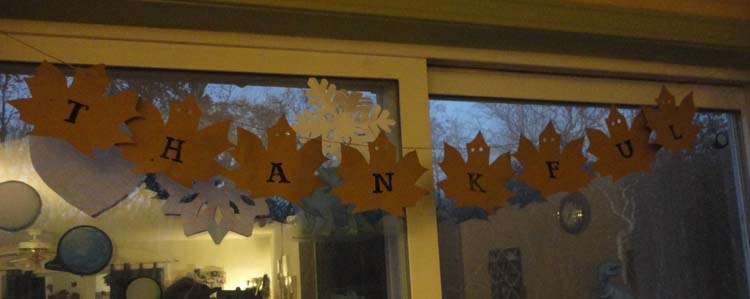
Nice and simple--that was my inspiration. This particular project can be found at Organize Your Stuff Now, but this really was just my inspiration. I turned it over in my head for a while--I knew I wanted leaves that would spell out "thankful," but I wasn't sure if I wanted the kids involved--should we paint the leaf shapes? But I really wanted simple brown paper. Perhaps block out the letters with painter's tape, have the kids paint, and then peel them off? But that wouldn't really work with brown paper, either, although I think it would look great, just in a different way. Eventually, I decided this was my project. (Sorry, kids.)
There is no need, if you live in New England and find humongous golden maple leaves littering your driveway every morning, to look farther than your front door for a leaf template, so that is what I did.
I traced a big maple leaf. If you like this idea but don't have any maple leaves to trace, you can find my simple template here. I do mean simple--I didn't even erase the pencil lines after I went over it with a Sharpie. I traced my leaf onto cardstock to make a firmer template, then cut eight leaves from brown paper bags. I'd say this was recycling, but every time we want a brown paper bag for something, we have to get one special, since I always take reusable bags to the market (and have been doing so for so long--at least a decade--that when I began, I got funny looks from the cashiers). So it's not quite recycling, I suppose, but it got me the look I was going for.
I happen to have a set of foam alphabet stamps that were a good size for these leaves, so I brushed a thin coat of black liquid acrylic paint onto the letters and stamped my leaves.
![]() |
| This time I tried a morning shot. That's fog out there. |
We don't have a fireplace and mantel, so this large slider window is my go-to spot for hanging. I love this simple little banner. And if you balk at tracing and cutting eight leaves, I can tell you that it was oddly soothing, to repetitively cut out leaves. I enjoyed it.
As an added bonus, the slider is in the dining room, where we eat all our meals (having a galley kitchen), so we have a beautiful, simple, visible reminder to be Thankful for all we have.
See more creative folks here!
Tuesday, November 8, 2011
DIY: Bottle Cap Magnets
{This post originally appeared in slightly different form on Kidoinfo.com.}
![]() | ||
| I had to Photoshop the kid-scribbles off my fridge in this photo. |
I made sets of these last year using photos of my kids as Christmas
gifts for the grandparents, but you could put anything you want inside of those
bottle caps—photos of your cats, letters to spell out a name, whatever you
fancy!
Materials:
*Digital photo(s) of your kids: Faces should be head-on, but
this doesn’t need to be a close-up, since you’ll be using a 1” diameter circle.
I used one photo in which all three of my children were smiling.
(Go me!)
*Clean bottle caps, one for each magnet
*Mod Podge Matte and a brush for applying it
*Mod Podge Dimensional Magic: I found this at Joann’s,
hanging above the other glues. It replaces the nasty-smelling toxic resin for
these sorts of projects.
*Small, strong magnet: You can get a package of these at a
craft store
*Strong glue: I’ve had middling success with a hot glue gun.
Sometimes it works, and sometimes it doesn’t, and then I resort to the really
strong smelly glue to show that magnet who’s boss.
*1” diameter hole punch (typically found in the scrapbook
section) or scissors
*Pin or toothpick (for piercing wee little air bubbles)
1. Open your photo in the editing program of your choice.
Set the crop tool to 1” by 1”, keeping the original resolution so that the
photos will be as crisp as possible. Crop around the face, remembering that
this will eventually be a circle and the corners won’t be included. If your
editing program lets you crop to a 1” circle, even better. Save a version of
the cropped photo.
2. Drop the cropped photo into a document program (I used
Publisher, but Word will work, too), making sure that it’s sized at 100%. Copy
and paste as many as you need. If you don’t have a 1” diameter hole punch,
insert a 1” circle shape and position it over your photo. This will be your cutting
line. (If you’re not sure how to insert a 1” circle shape, you can trace a
quarter onto your printout before cutting.) Print your photo sheet onto regular
printer paper, not photo paper.
3. Cut out your photos with either scissors or your hole
punch. This one that I’m using lets you position the paper so you can see where
you’re cutting. I love it.
4. Using a brush, apply a light coat of Mod Podge into the
bottom of the bottle cap, place your picture, pressing lightly, and then cover
it with another coat to “seal” it. Start at the edges, dabbing the glue into
the gaps at the ridges, and then fill in the center with a thin but full coat
of the glue. You may want to test on a spare photo to decide on the best
method; depending on your printer and ink, the paper may need to set for a day
first, or you may be better off applying a few thinner coats, letting them dry
in between.
5. When the Mod Podge has dried (at least a few hours),
carefully pour in the Dimensional Magic. (Do not shake it first! That will
cause air bubbles.) Hold the bottle at an angle, and make sure your bottle cap
is resting on a flat surface, somewhere it will not be disturbed by children or
pets for the next 24 hours. Fill the cap up to about where the crinkly bits
begin. Do you see any bubbles? Carefully try to pop them now. Check it
periodically as it dries, too, and don’t be surprised if some show up when you
go to bed, just to vex you. Your magnet may have some bubbles, but it’s
handmade with love and if it were absolutely perfect you may as well just buy a
mass-produced boring gift, right?
6. When the Dimensional Magic is completely set (at least 24
hours), turn the caps over and attach the magnet. It’s okay at this point to
rest them flat, upside down, so the glue can set as well.
7. Put the set you made for yourself (you did make a set for
yourself, yes?!) on your fridge and marvel at your craftiness and your cute kids (or cats, or whatever).
Go you!
Subscribe to:
Posts (Atom)